Every so often, I like to step away from the usual writing-focused posts on my blog and give readers a glimpse into other aspects of my life. Today, I’m doing just that by sharing one of my favorite personal hobbies: making goat milk soap.
If you’re unfamiliar, goat milk soap is a natural and incredibly beneficial product, derived from goat’s milk. It possesses a host of healing properties and has been utilized for centuries to alleviate various skin conditions, from dry, cracked skin to more serious ailments such as eczema, psoriasis, and acne. This enriching soap is brimming with vitamins A and D, known for their skin-healing benefits, and high in fatty acids, which help maintain skin hydration and promote regeneration. Today, I’ll take you through my process for crafting this soap at home, including important precautions and steps to ensure the best quality product.
The day before you make the soap, you must freeze your goat milk. I find it’s easier to freeze mine in plastic ice trays (1 oz. per cub). I simply count out how many ounces I need and go from there.
Always wear rubber gloves (I recommend ones that cover your forearms), safely goggles and have lots of ventilation. Working with lye can be dangerous.
Gather a clear glass or stainless-steel bowl, staying away from plastic as it has the tendency to retain odors. Put this inside a larger bowl or sink filled with cold water and plenty of ice cubes. Place your frozen cubes of milk into the inner bowl to keep them cold.
Start by adding the lye to the milk and mix them together with a stainless-steel potato masher or similar device. I use a fork. Keep stirring until all the lye is incorporated. Don’t worry if the mixture doesn’t get hot or warm, it’s not meant to do that. Refresh the ice in the bowl you put aside earlier, if needed. The color of the milk might change to orange, tan or light brown – this is normal. If it turns darker than that, throw the mixture out and start over. The milk has been burned. The sugars in the milk must stay cold or else they’ll be scorched. Additionally, you may smell an ammonia-like odor, but it will dissipate later on as it cures.
Once your lye/milk mixture is prepared, make sure to store it in the freezer for now. Utilize a kitchen scale to measure out the oils needed. After the oils have been weighed, gently heat them up until they reach between 110° – 125°F.
When the fats are blended, carefully pour in the lye/milk solution. Stir by hand for the first 5 minutes and then use an immersion blender to thicken it up until it reaches a trace. This is when the soap batter resembles a thick pudding. Once it’s reached trace, add your essential oils and any other ingredients before transferring it into molds.
Most soap makers will recommend the soap to sit in molds for at least 24 hours or more before cutting. I don’t. I wait until it’s cool, unmold and slice it. After that it goes into my soap cabinet to cure for 3-4 weeks. It’s ideal to test the soap pH (8-10) with strips to know if it’s cured enough.
Ingredients You Will Need
15 oz olive oil. I infuse mine with marigold leaves, dandelion or rose petals.
12 oz coconut oil
13 oz sustainably sourced palm oil, lard or tallow. I use vegetable shortening.
13 oz goat milk. Fresh from my nannie goats.
6 oz 100% sodium hydroxide (lye). I order mine from Amazon.
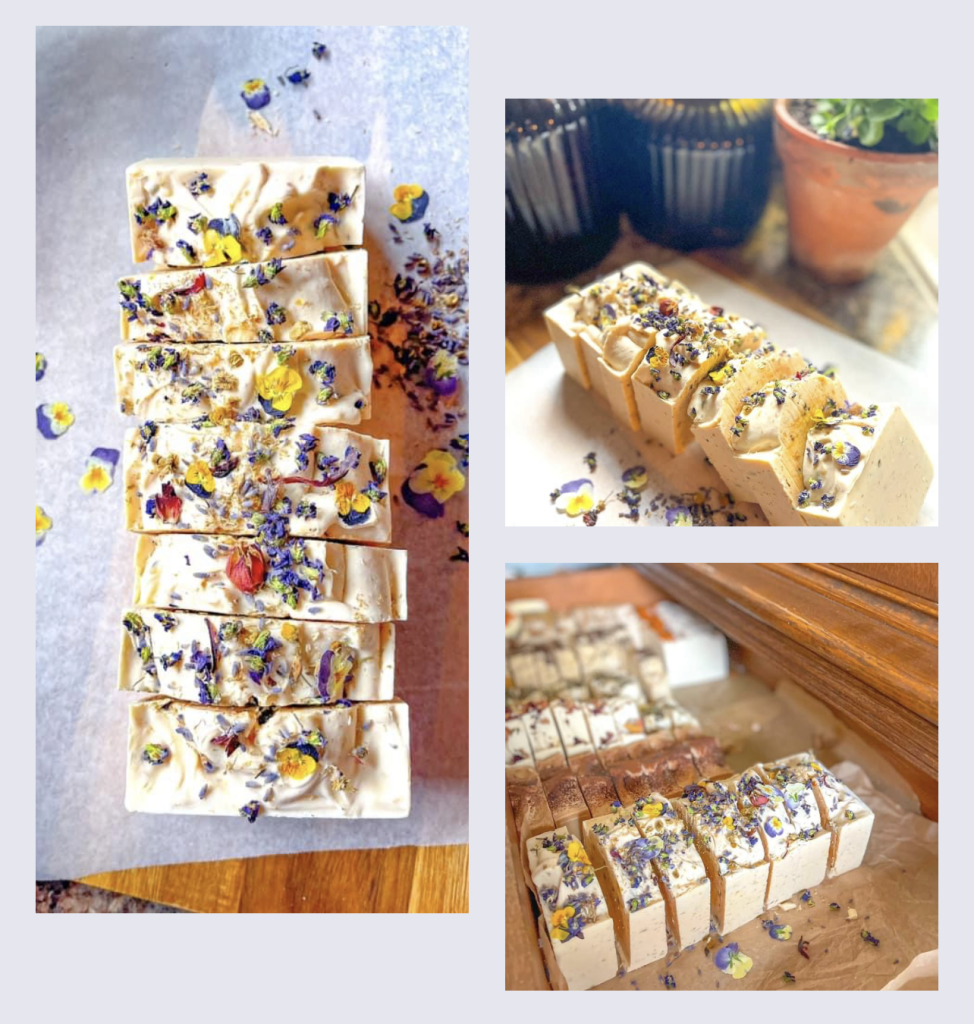
1 oz essential oils. I used oak and lavender for this recipe.
I grow and harvest herbs, vegetables and flowers from my garden and like making my own tea blends, so it’s easy for me to throw in a little of this or that. I added to this soap lavender, rose hips and buds. Since Easter is only a few days away, I’ve been harvesting and pressing organic pansies from pots in my sunroom for cupcake decorations. I thought they added a spring touch to the soap.


Leave a Reply